Watermarking An Image
On the internet it is difficult to protect images from being taken and used without permission. Sometimes just adding text tot he image, for instance the word SAMPLE, is an option. However that method can detract from the image and make it less appealing. A better solution is to "Watermark" the image. Watermark is transparent and allows the image to show through while still rendering it useless to anyone who wanted to take the image and use it without permission. You can save the watermark in PSP format and reuse it as often as you like. Ok! Now lets get started.
Creating the Watermark
1. Start by opening a new image, 300 x 300, white background. This may seen to large for your image right now, but we will resize it later on.
2. Click on your shapes tool. Go into tool options and set the shape to ellipse, style stroked, line width 10, and antialias and create as vector checked. Make sure your foreground color is set to black.
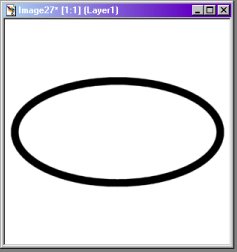
3. Now put your mouse at coordinates of 150 x 150. Drag your mouse until your ellipse as large as you would like it. Now go to SELECTIONS/SELECT NONE. You should now have an image that looks like this
4. Now click on your text tool. Choose a wide or fat font ( they show up better than small, thin fonts). Set your text color to black. Type in your text and click OK. Go to SELECTIONS/SELECT NONE. You will be given a message that the current floating selection will be deflaoted down to the nearesr rater layer and asked if you are sure. Click YES. Now go to LAYERS/MERGE/MERGE ALL FLATTEN You should now have an image that looks like this

5. Choose your magic wand from the toolbar. Click on the background of your image. Go to SELECTIONS/INVERT. Now only your ellipsed area should have the marching ants around it. Go to EDIT/COPY and copy your selection.
Applying the Watermark to your image
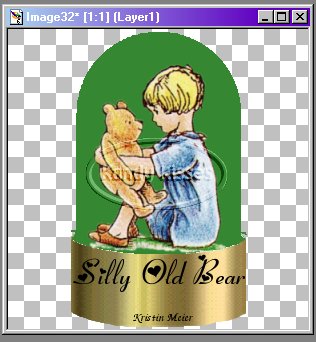
6. Open up the image you want to apply the watermark to. I used one of my globes for this tutorial.
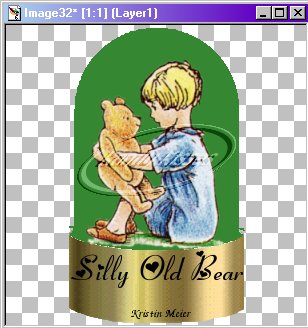
7. Now go to EDIT/PASTE AS NEW LAYER. Now your image should look like this

8. As you can tell the watermark is larger than you need it to be, but resizing only the image on the new layer is simple. It will not affect your main image sixe at all. Go to IMAGE/RESIZE and resize it to the percentage you want. Make sure that resize all layers in NOT checked, then click OK. Now the size should look much better. You can also make your watermark very small if you want to use it to add an indiscrete mark on the image that isn't too noticable.
9. Now go to IMAGE/OTHER/EMBOSS and apply. Now your watermark looks something like this

10. Right click on Layer 1in your Layers Palette. Click on Properties. On Blend Mode click on the dropdown list and choose either Soft Light or Overlay. There isn't alot of difference in the two, but sometimes depending on the image, one will look better than the other. Now your watermark should be transparent and blend into the image like this
No matter where you place it the image behind it shows through. Now if you want to add a little something to it you can use the deforamtions tool to change how your watermark looks. Go to IMAGE/DEFORMATION/SKEW. Then decide how you want your watermark to look, for a starting point set your horizontal to 45 and your vertical to 0. Click OK. Now you should have an image like this
11. When you are happy with the placement of your watermark, go to LAYERS/MERGE/MERGE ALL FLATTEN. Now you have your watermarked image.
12. Now save your watermark image, with the ellipse still selected, in PSP format. That way when you want to use it all you have to do is open it up and then go to EDIT/COPY and paste it into your image that you want watermarked.

BACK